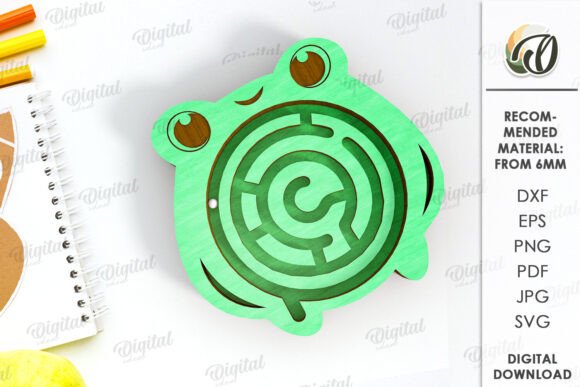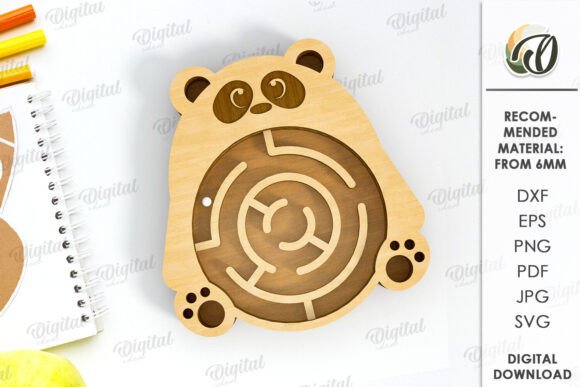
Mastering the 3D Kids Maze Toy Lasercut Bear SVG for Precision Crafting
Creating tangible, interactive toys from digital files is one of the most rewarding aspects of modern laser cutting. The 3D Kids Maze Toy Lasercut Bear SVG represents a perfect intersection of playful design and technical precision. However, many creators approach these digital downloads with assumptions that can lead to wasted material and frustration. Understanding the nuances of this specific file type is essential for anyone looking to produce high-quality, durable puzzles for children or decorative pieces for home offices.
It is crucial to remember that this is a digital product. No physical goods will be sent to your address. The photos provided in the listing are intended only for inspiration, showcasing what is possible when the file is used correctly. Your purchase grants you access to a zip folder containing the design in multiple formats, including SVG, DXF, EPS, PDF, JPEG, and PNG. This versatility allows you to work with various software platforms, but it also requires you to understand which format suits your workflow best.
The Critical Importance of Material Thickness
The most common mistake beginners make is ignoring the specific material requirements outlined in the file description. For this particular bear maze design, the material width required is 6mm. This is not a suggestion; it is a structural necessity. Laser-cut puzzles rely on friction fits and precise slot dimensions. If you attempt to use 3mm plywood or 4mm acrylic, the joints will be loose, causing the maze to fall apart during play. Conversely, using 8mm material may result in parts that simply do not fit together, forcing you to sand down edges aggressively, which ruins the clean aesthetic of the cut.
Many hobbyists assume they can scale the file to fit whatever scrap wood they have on hand. While scaling is technically possible, it alters the tolerance of the joints. A better approach is to source the correct 6mm material before you even open your design software. Birch plywood is often the ideal choice for this thickness, offering strength and a smooth finish that is safe for children. By adhering to the 6mm requirement, you ensure that the maze walls stand upright and the ball bearing (if included in your physical assembly) rolls smoothly without getting stuck in gaps caused by poor fitment.
Navigating File Formats and Software Compatibility
Another frequent oversight involves the selection of file formats. The zip folder includes SVG, DXF, EPS, PDF, JPEG, and PNG files. Beginners often grab the JPEG or PNG, assuming they are easier to handle because they are standard image files. This is a significant error. Raster images like JPEGs and PNGs do not contain vector paths. When you import these into laser software, the machine may interpret them as engraving areas rather than cut lines, leading to burned edges instead of clean cuts.
For optimal results, use the SVG or DXF files. These vector formats preserve the mathematical precision of the lines, ensuring that your laser cutter follows exact paths. If you are using LightBurn, the DXF format is often preferred for its robust handling of nodes and paths. If you are working in Adobe Illustrator or Inkscape, the SVG or EPS files will allow you to edit individual elements, such as changing the bear’s expression or adjusting the maze complexity. Always inspect the vectors after importing. Look for open paths or duplicate lines, which can cause the laser to cut the same line twice, wasting time and potentially burning the material.
Design Intent and Structural Integrity
When evaluating the 3D Kids Maze Toy Lasercut Bear SVG, it is important to recognize that the design is engineered for specific mechanical interactions. The maze channels are designed with specific widths to accommodate standard marbles or ball bearings. A common misunderstanding is that any small sphere will work. However, if the ball is too large, it will jam; if it is too small, it may slip through gaps in the layers if the assembly is not perfectly aligned.
To avoid this, test the fit of your chosen ball bearing with a scrap piece of your 6mm material before committing to the full project. Dry-fit the layers without glue first. This step allows you to check the alignment of the maze paths. If you notice resistance, do not force the pieces. Instead, check for char buildup on the edges, which can add fractional millimeters of thickness. A light sanding of the interlocking tabs can often resolve fit issues without compromising the structural integrity of the toy.
Maximizing Value for Home and Office Use
This design is not limited to children’s playrooms. It serves as a great solution for creating an original design for your home or office. Professionals and entrepreneurs can use these mazes as desk accessories that promote focus and fine motor skills. The possibilities of creation are endless when you consider finishing techniques. Painting the layers in contrasting colors can enhance the visual appeal and make the maze path easier to follow. Alternatively, leaving the wood natural and sealing it with a non-toxic oil highlights the grain and maintains an organic, sophisticated look suitable for professional environments.
When preparing the file for production, consider the grain direction of your wood. Aligning the grain perpendicular to the longest stress points can prevent warping over time. This is particularly important for items that will be handled frequently. Additionally, ensure that your laser settings are calibrated for 6mm material. Power and speed settings that work for 3mm will not penetrate 6mm effectively, leading to incomplete cuts and fragile pieces.
Final Checks Before Cutting
Before you send the job to your laser cutter, take a moment to review the design one last time. Ensure that all layers are properly organized in your software. Label each layer clearly to avoid confusion during assembly. Since this is a multi-layered 3D object, keeping track of which piece goes where is vital. Some creators find it helpful to print the PDF version of the file as a reference guide while assembling the physical toy.
Remember, the quality of your final product depends heavily on the preparation phase. By respecting the material constraints, choosing the correct file format, and understanding the mechanical design of the maze, you can avoid common pitfalls. This attention to detail transforms a simple digital download into a high-quality, engaging tactile experience.
If you encounter specific issues with your software or have questions about optimizing the design for different materials, do not hesitate to reach out. Please write me a message if you have a question. Support is available to help you troubleshoot technical hurdles, ensuring your project succeeds. Happy shopping, and enjoy the process of bringing this charming bear maze to life.